


Optical Character Reader or Optical Character Recognition (OCR) is a technique used to convert the text in visuals to machine-encoded text. These visuals could be printed documents(invoices, bank statements, restaurant bills), or placards(sign-boards, traffic symbols ), or handwritten text. Converting these visuals to text could be handy for information extraction, scanning books or documents and making PDFs, storing in the system or working with it online such as text to speech(this could be of great help to visually impaired people), used widely in autonomous vehicles to interpret various things. OCR is an emerging technology that is enhancing for better accuracy in performance.
EasyOCR is a python package that allows the image to be converted to text. It is by far the easiest way to implement OCR and has access to over 70+ languages including English, Chinese, Japanese, Korean, Hindi, many more are being added. EasyOCR is created by the Jaided AI company.
In this article, we will be discussing how to implement OCR using EasyOCR. Let’s start by discussing EasyOCR and installing it for our use.
All About EasyOCR
EasyOCR is built with Python and Pytorch deep learning library, having a GPU could speed up the whole process of detection. The detection part is using the CRAFT algorithm and the Recognition model is CRNN. It is composed of 3 main components, feature extraction (we are currently using Resnet), sequence labelling (LSTM) and decoding (CTC). EasyOCR doesn’t have many software dependencies, it can directly be used with its API.
Installing with pip
pip install easyocr
Now we’re ready to start our detection process.
Text Detection in Images with EasyOCR
EasyOCR can process multiple languages at the same time provided they are compatible with each other.
The Reader class is the base class for EasyOCR which contains a list of language codes and other parameters such as GPU that is by default set to True. This needs to run only once to load the necessary models. Model weights are automatically downloaded or can be manually downloaded as well.
Then comes the readtext method which is the main method for Reader class.
Let’s read text from the below image:

import easyocr
reader = easyocr.Reader(['en'])
result = reader.readtext('/content/aim.png')
print(result)
OUTPUT: [([[56, 84], [224, 84], [224, 116], [56, 116]], 'Analytics India', 0.5051276683807373),
([[54, 118], [142, 118], [142, 142], [54, 142]], 'MAGAZINE', 0.6871832013130188)]
The output shows 4 bounding box coordinates(x,y) of the text along with the identified text and confidence score.
This kind of output could be difficult for non-developers to read hence we can pass the detail parameter as 0 for simpler output.
result = reader.readtext('/content/aim.png', detail = 0)
OUTPUT - ['Analytics India', 'MAGAZINE']
In the code, we’ve set the language as ‘en’ meaning English.
Images can be directly read from URLs also:
res = reader.readtext('https://3v6x691yvn532gp2411ezrib-wpengine.netdna-ssl.com/wp-content/uploads/2019/05/imagetext09.jpg')
Another important parameter is the paragraph, by setting it True EasyOCR will combine the results.
res = reader.readtext('/content/aim.png',detail=0,paragraph=True)
print(res)
OUTPUT - ['Analytics India MAGAZINE']
Finding out the bounding boxes in the image
import cv2
import matplotlib.pyplot as plt
image = cv2.imread('/content/aim.png')
res = reader.readtext('/content/aim.png')
for (bbox, text, prob) in res:
  # unpack the bounding box
  (tl, tr, br, bl) = bbox
  tl = (int(tl[0]), int(tl[1]))
  tr = (int(tr[0]), int(tr[1]))
  br = (int(br[0]), int(br[1]))
  bl = (int(bl[0]), int(bl[1]))
  cv2.rectangle(image, tl, br, (0, 255, 0), 2)
  cv2.putText(image, text, (tl[0], tl[1] - 10),
    cv2.FONT_HERSHEY_SIMPLEX, 0.8, (255, 0, 0), 2)
plt.rcParams['figure.figsize'] = (16,16)
plt.imshow(image)
EasyOCR works with BGR images with OpenCV unlike tesseract which needs to be converted in RGB

Now let’s try with other languages

reader = easyocr.Reader(['en','ja'], gpu = True)
res = reader.readtext('https://lh3.googleusercontent.com/proxy/dnD7G2hjnITblaSNAiPEYL3vkE_v73-NwdboS-Dacj6P61CrjuQv4pBqLiD6ADWKl6VrtkjnAg9K-ur0fwBohq8BMk_TWacHr5r5K_cpBb9b',detail =0,paragraph=True)
print(res)
Output : ['頑張ろぅ!', ‘Let's do, our best!']
In the above code, ‘ja’ stands for Japanese.
This is a Spanish Traffic symbol ALTO which means stop

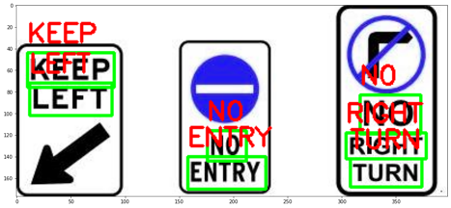
EasyOCR on different images

Conclusion
EasyOCR in many aspects performs better than tesseract(another OCR engine created by google used with python package Pytesseract). It is easy to use and needs only a few lines of code to implement and has proper accuracy for most tested images and extended over a wide range of languages.
The complete code of this implementation is available on the AIM’s GitHub repository. Please visit this link for the notebook with complete code.